Wednesday, September 25, 2013

CMM CONTRACT INSPECTION IN CHENNAI


GMT CMM CONTRACT INSPECTION 

Guindy Machine Tools Ltd, offers a unique CMM contract / parts inspection service to industries in and around Chennai. 


We have the experience, expert knowledge and technology to assist with your inspection requirements with video and optical inspection services. In-house services are offered to companies that do not have the capabilities, resources, or time to inspect their own product. 

We can offer competitive rates for inspection with full CMM reporting facilities that can be customized with your own logo and company details.  The coordinate measuring machines are calibrated to ISO10360 ensuring complete traceability of your reports. 

Scope of Inspection:-
1.Prismatic Parts
: Jigs, Fixtures, dies, moulds, engine blocks, turbine blades, electrical and electronics connectors are some of the parts we have provided these services for. Large parts upto 2 m in length can be inspected. Both one-off and batch inspection are possible
2.Free form Components- Direct comparison to CAD data

3.Reverse Engineering with CAD export (IGES)
4.Die & Mold inspection
5.Drill Jigs & Fixtures
6.Special Position Gauges
7.Continuous Scanning with SP25


Guindy Machine Tools Ltd, is the quality choice for all of your CMM inspection needs. Contact us or call +919940101912 today.

Sunday, September 22, 2013

Advantages of lapping

What is lapping?
Lapping is the first mechanical precision finishing  operation in done to achieve high dimensional accuracy. It helps you achieve positive sealing by obtaining high degree of flatness and surface finish. The advantages of lapping for obtaining fine flatness and surface finish have long been recognised by production and design engineers.
Advantages:
lapping_machines
A wide variety of materials can be lapped.
Flatness to one light band (0.0003 mm) on 100 dia.
Surface finish to less than 0.2 µRA.

Some reasons why lapping machines help to transform a costly, rarely used, hand operation to a fine accuracy, economical process:-
Parts of different shapes, thickness and material can be lapped.GMT has supplied lapping machines to lap various metals, plastics, glass, ceramic and granite. conditioning ring
Because the lap plate continuously maintains its flatness, production is not interrupted.
Appropriately selected diameters of the conditioning rings result in optimum lapping area.
Lapping cycles are controlled by an automatic and adjustable digital display times.

Thursday, September 5, 2013

GMT Special Applications Granite Metrology Products


Granite bonded with metal has resulted in specials for many applications. Apart from complete range of standard granite and cast iron metrology equipment, including Surface Plates, Master Square, Tri Square and cubes, GMT also manufactures custom built special application metrology products.


Some of the applications include master square for alignment of machining center, Large size Granite Plate, Granite Base Structure for Contact Lens Grinding Machine, Run out Measurement System, fine pitch accuracy granite table, Granite structure for image processing machine etc.


Granite Best Suited for Metrology:

GMT has a metrology division located at Hosur, Tamil Nadu. This region is home to large deposits of world famous Indian black diabase granite. Indian black granite is best suited for metrology application. Granite Surface Plates are made from granite selected with great care at the quarry, by our experts.The uniform distribution of light and dark constituent minerals of this granite, result in a homogenous surface ideal for measurement reference.The following are the representative properties of our granites.
Texture : Fine. Specific Gravity : 3.08.Hardness :Scleroscope over 90. Modules of Elasticity : 9.0 to 12.0 x 10 Moisture of absorption : Nil.

Wednesday, September 4, 2013

GMT GRANITE TRI SQUARE


Made of Indian Black Granite and provided with through-holes for weight reduction and ease of handling. All 6 sides are lapped to maintain flatness, squareness and parallelism. 

GMT Granite Tri-Squares provide an excellent, economical way for accurately checking the X-Y-Z axes on CNC machines, milling machines, coordinate measuring machines. 

Lying in the horizontal position, (on surface 3 or 4) the X and Y axes can be checked for 90° squareness. With the square in the vertical position, tracing along the vertical edge of the square can check the perpendicularity of the Z axis.Tri-Squares have 6 finished faces.

Custom sizes can be supplied upon request.
Accessories  Wooden case.
SPECIFICATIONS
Dimensions (mm)
Thickness
Weight (Kg)
Grade 0
Small Length x Width
   
(µ)
300 x 200
70
10
3
400 x 200
70
13
3
500 x 200
70
15
5
630 x 400
75
26
5
800 x 500
90
70
5
1000 x 630
120
140
10

GMT METROLOGY DIVISION - GRANITE SURFACE PLATES


Why GMT Granite Products?
GMT's metrology division is located at Hosur, Tamil Nadu. This region is home to large deposits of world famous Indian black diabase granite. Indian black granite is best suited for metrology application as this granite as a very fine-grained structure. The properties, which help in selecting a rock for metrology application are density, water absorption & porosity, flexural and compressive strength.

Advantages of Indian Black Granite:
Low coefficient of expansion and thermal stability
Water absorption and porosity is low and hence long term dimensional stability is good
It is fine-grained and the density & hardness is suited for dimensional metrology
Flexural strength, Compressive strength, Modules of rupture and Tensile stress
Totally corrosion free, granite does not rust nor corrode or react chemically with other substances
Non Magnetic and non-conductive
Non-reflective matt finish; Hand lapped for maximum accuracy
High flatness accuracy
Ideal for guideways for measuring instruments and air bearing surfaces
High bending strength
Insensitive to mechanical overloading
All calibration equipment is to national and international laboratories standards


PRECISION GRANITE SURFACE PLATES
SPECIFICATIONS
FLATNESS TOLERANCE IN µm FOR ACCURACY GRADE
SIZE OF
PLATE (in mm)
AS PER DIN 876:84
AS PER IS 7327-2003
WEIGHT
in Kgs.
(Approx.)
GRADE "00"
GRADE "0"
GRADE "1"
GRADE "2"
GRADE "3"
250 x 250
3
3.5
7
15
30
10
300 x 300
3
3.5
7
15
30
22
400 x 250
3
4.0
8
16
32
20
400 x 400
3
4.5
9
17
34
40
500 x 300
3
4.5
9
17
34
35
630x 400
4
5.0
10
20
39
65
630 x 630
4
5.0
10
21
42
100
800 x 500
4
5.0
10
21
42
120
1000 x 630
4
6.0
12
24
49
320
1000 x 1000
4
7.0
14
28
56
500
1200 x 800
4
7.0
14
28
56
475
1600 x 1000
5
8.0
16
33
66
1100
2000 x 1000
6
9.5
19
38
75
1650
Application
Surface plates are used as reference planes for dimensional inspection and calibration of mechanical artifacts. This plate acts as a datum line or surface. So, the flatness of the plate is very important. Dolerite is the perfect material for metrology, because of the inherent characteristics mentioned above. The definition of flatness is, ‘all points on the surface being contained within two parallel planes, the base plane and the roof plane’. This flatness measurement commonly carries a tolerance and may include a grade designation. Flatness tolerance of the surface plate is provided in the standards with different grades based on flatness.

GMT Metrology Granite Surface Plates meet the DIN and IS Standards specified in the table above. Granite Surface Plates are manufactured to precision standards using the highest quality granite.
Accuracy
Rigorous quality control inspection is carried out at all stages. Final inspection is carried out at a High Precision Computerised Electronic Level calibrated by an NABL accredited lab at regular intervals..
Accuracy under Load
Granite Surface Plates are capable of supporting a total normal load of 25 kgs. per 0.1 sq.mtr.
Certificate
A certificate of accuracy is supplied with each plate as per standards specified.
Technical Data
Granite Surface Plates are manufactured in five grades. The typical application of these five grades of plates is as under:
GRADE 00 as per DIN : 876 : 84 is of laboratory grade. It is specified for precision measurement in gauge rooms and metrology laboratories for calibration masters.
GRADE 0 is of inspection grade. It is specified for general work in quality control.
GRADE 1 is of tool room grade. It is specified for production checking work through the shop.
GRADE 2 & 3 are intended for use in shops for general inspection. The choice of Grade 2 & 3 will depend on the application needs of the customer.
MATERIAL
Granite Surface Plates are made from select granite with uniform distribution of light and dark constituents. In such granite the minerals are evenly distributed resulting in a homogenous appearance.
The following are the representative properties of our granites :
Texture Fine
Specific Gravity 3.08 g/cm3
Hardness Scleroscope over 90
Modules of Elasticity 9.0 to 12.0 x 10⁵kg/cm2
Moisture of absorption Nil
FLATNESS TOLERANCE
The flatness deviation of a local area of 250 mm x 250 mm of the working surface shall not exceed :
1
3.0 µm for plates of Grade 00
2
3.5 µm for plates of Grade 0
3
7.0 µm for plates of Grade 1
4
15.0 µm for plates of Grade 2
5
30.0 µm for plates of Grade 3
GRANITE SURFACE PLATE STANDS
These are fabricated of heavy angle iron and reinforced to ensure rigidity. The stands are designed to withstand the weight of the granite surface plates and are supplied with 3 leveling screws for leveling the granite surface plates. OPTIONAL ACCESSORIES
Plate will be supplied with a suitable Rexine Cover to protect both the working surface and side faces of the plate at extra cost.

Tuesday, September 3, 2013

GMT Diaphragm Chucks


GMT Diaphragm Chucks are primarily used for light accurate turning, fine boring, facing and grinding operations. Diaphragm Chuck enables improved accuracy and consistent concentricity to be obtained during precision machining operations.

OPERATION: Compressed air is fed through a stationary distributor to the piston. The piston flexes
the diaphragm, which opens the jaws, enabling the work piece to be loaded on the chuck. When the air pressure is released, the diaphragm returns to its normal position, closing the jaws to grip the work piece.

Diaphragm is made of spring steel and toughened. Base jaws are made of nickel chrome steel, case hardened and precision ground. Piston is made of forged steel and toughened. Stop plate, which provides the face butting for the component is rigidly fastened to the non-moving housing and provides for accurate end location.

Sunday, September 1, 2013

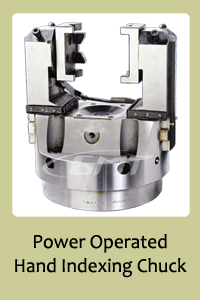
GMT Power Operated Hand Indexing Chucks


The production and machining of components with intersecting axes has for a long time involved  high processing expenditure. These components were either processed on special machines, transfer lines or on conventional lathes in several chucking operations.

GMT has developed Indexing Chucks to meet the persistent problems in machining components with intersecting axes. GMT indexing chucks of different sizes are designed for machining typical parts. Universal joints fittings, pumps bodies, valve bodies etc.

GMT’s Power Operated Hand Indexing chucks are offered with index position:
1. 4 x 900
2. 3 x 1200
3. 2 x 1800

Indexing Accuracy
Roughing: Approx. 0.1mm at 100mm from indexing centre.
Finishing: 0.03 to 0.05 at 100mm from indexing centre.

The actuation of the two jaw power operated chuck jaws is effected by a pneumatic rotating cylinder, Hydraulic-rotating cylinder or by an Electro Mechanical Actuator. The component is clamped between the jaws. After the machining operation is over the index lever is lifted and component with the jaws is indexed to the next position. The index lever locks automatically.

All parts are made from alloy steel hardened and ground wherever necessary.